Zug Guy
An Engineer, born a century late…
Through a glass, not so darkly…
This time I’m following Derek’s TrainGlass.fx tutorial. I’ll need to somehow enable “Z Buffer Test Only” for the material, set “UV Arguments” for the first time, and figure out how Blender specifies specular power.
Derek explains the material properties involved and the appropriate UV arguments for three different glass effects. My job is simply to show you how to twiddle Bender and Bigex to yield the same results as Derek.
As Derek explains, the TrainGlass.fx shader requires two texture slots to be filled. The first containing the glass texture and alpha channel, and a second dummy slot for the convenience of the shader code. The dummy texture can be anything, and as the engine will have already loaded the glass/alpha texture the simplest thing to do is reuse the glass/alpha texture. No additional GPU load required.
Derek builds three assets with differing UV arguments, I’ll build one, glass “A”, to start. Pull up the TrainGlass.fx tutorial in another browser window and follow along. Start Blender and press “F5” to bring the materials panel into the Button window.
In an earlier post I described some changes to the Bigex IGS_ExpModFile.txt that let me set “TRANS” mode on a material. The modifications included a reference to using “ZTO” in a material name. Placing “ZTO” in a material name with the modified IGS_ExpModFile.txt results in “Z Buffer Mode TEST ONLY” set for the material, a requirement for using TrainGlass.fx
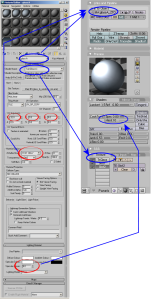 In the “MA:” field of the “links and Properties” tab, I’ve named the material “glassA_ZTO” to invoke the correct Z Buffer mode on export. I’ve set the name of the top Blender texture channel to “TrGlass”, the shorthand Bigex name for the TrainGlass.fx shader. I’ve set the name of the 2nd texture channel to “Slot1”, and the 3rd texture channel name to “Slot2”. The texture channel names are for convenience only, use ones that make sense to you. The same can be said for material names, with the exception of the “TRA” and “ZTO” conventions I’ve adopted here.
I’ve also found a home for the specular power value in Blender/Bigex. In the glassA example, Derek specifies a specular power of 8. To match that in Blender, I’ve set two values in the Blender Shader Tab, a “Spec” value of .8 and a “Hard” value of 10. These two values are multiplied together in Blender/Bigex, resulting in a specular power of 8 on export.
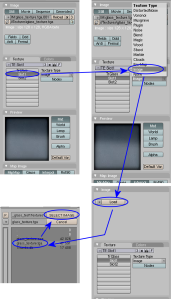 Now, I need to identify the actual texture files for Slot1 and Slot2. I press “F6” to display Blender’s Texture Panel, click on the Slot1 texture channel, select a Texture Type of Image, and Load the actual texture file. I repeat this for Slot2, pointing to the same texture file.
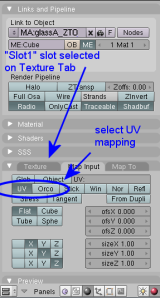 I also need to set “UV” mapping for Slot1. With the “Slot1” slot in the Texture Tab selected (click on it to select), click on the “Map input” tab. Now click on the “UV” button to select (darken) it. UV (coordinates) needs to be selected because the IGS format only supports UV coordinate mapping. After I repeat this for “Slot2” I click the Texture Tab again and see the “slot” stack.
 A reminder that the TrainGlass.fx shader uses a texture with an alpha channel to control the material transparency. I’ve used a texture similar to Derek’s, shown on the left. The pure white areas of the alpha indicate that the texture is completely opaque in those areas. The darker an area in the alpha, the more transparent the material will be in that area.
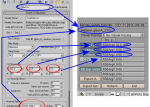 The proper UV arguments for the material have to be set. UV arguments are specified using the Bigex export menu and are retained in the .blend file along with your model, shader, and texture information. To set the UV arguments for a material, I open the Bigex export menu with “File -> Export -> RailWorks Bigex (.igs)”, then select the material that I want to set UV arguments for in Blender’s outliner window.
The material name should appear in the upper left of the Bigex export window, like “glassA_ZTO” in the image on the left. If it doesn’t, press the “Refresh” button in the Bigex menu. I’ve filled in the UV arguments for the glassA_ZTO material to match Derek’s arguments by clicking on the matching “RSArgx” field and entering the desired value. Note that the UV argument numbering is different in Blender/Bigex than with 3DSMax and the Kuju art plugins. Blender/Bigex UV arguments start at zero, so Derek’s UV argument 1 goes into my UV argument 0. I don’t need to export anything right now and can exit from the Bigex export menu, the UV arguments will be retained for eventual use to modify the material attributes in the IGS file during export.
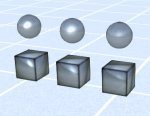 With the model complete and materials, textures and UV arguments defined, I can export to igs format with “File -> Export -> Railworks Bigex (.igs)”. After exporting the igs, converting the texture to 32 bit ace format, and using the asset editor to create a blueprint we have glass in the simulator! You can download zip files that contain the IGS_ExpModFile.txt that I used and my Blender interpretation of Derek’s example as well as the exported model and blueprint from here. There are three objects in the .blend to match all three of Derek’s glass assets.
Next time we may get our our feet wet.